Showing posts with label DIY. Show all posts

DIY: Burlap Box

Alright all you moms out there.  I know you'll love this project because I certainly do!

I saw this pin on Pinterest and finally got around to doing it.

All you need is:
~ a really messy spot
~ a diaper box
~ some light colored paint
~ hot glue
~ around 1 yard of burlap
~ ribbon
~ embellishments (optional - it looks cute with just the ribbon)
~ a smart and sassy Brit (this is not necessary but I had one spending the night at my house the day I did this project and I really liked it.  She also gave me a manicure that's lasting longer than when I paint my own nails.  She deserves her very own blog post...I'll start working on that.)

Choose your messy area.  Mine was our hall closet.  We had gloves, hats, scarves, leashes, and board games thrown into a heaping pile on a not-so-level shelf.  It got to the point when something would fall, I would cram the fallen item on the floor behind our vacuum.  Outta sight, outta mind.


Start by painting your box so that any bright, multi-colored patterns don't show through the burlap.  I used white acrylic paint and it actually dried super quick.


Unfortunately my camera died in the middle of the wrapping process but it's easy peazy.  There's not really a wrong or right way to do this.  Just treat it like a present and wrap it up, using hot glue wherever and whenever you want.


I glued the first edge in the middle of one of the long sides, planning for that to be the back.  Then when I folded the other side over, I folded the edge down so it left a nice crease and no raw edges were exposed.


This is where my camera died.  You really just do whatever works.  And of course extra burlap on the top is good.  Glue it down inside the box so that you don't see the cardboard when it's holding your clutter.


I did cut the flaps off the bottom of the box so it sits a little flatter.


After you're finished with your burlap, take your ribbon and glue it down.  I started at the back of the box, at the seam.  I put a line of glue, pressed down one edge of the ribbon, wrapped the ribbon tightly around the whole box, and glued it down once it met up with the seam again.  To finish up, I added 3 felt flowers with pearl brads.


That's it!


I was able to finished this project during one naptime.  You ask any mom and she'll tell you that's a feat.


Another Pinterest-ing Project

Would you like to guess where I got the idea for this next project?  If you guessed Pinterest, you guessed right!  This pin to be exact.

We did this project awhile ago and I just have not gotten around to sharing it.  So when I heard that Katie over at Bower Power and Sherry over at Young House Love were doing another round of their Pinterest Challenge, I knew I wanted to participate this time.

All you need for this project is:
~ a canvas (Fortunately we had recently grown to dislike the enormous 4'x4' canvas that was hanging in our living room so we decided to give it a little facelift.)
~ letters (We used two different kinds: the smaller letters are chipboard letters.  We found ours in the scrapbook section at Joann's.  The larger letters were from Hobby Lobby, 50% off!)
~ white spray paint
~ acrylic paint, any color.  The bolder the better. (This was how we put our own little spin on the project.)


If you're using a canvas you already have, make sure you wipe it clean of dust.

Pick your phrase!  For ours, we chose a phrase from our wedding verse, Song of Solomon 8:7.  
 Then using your letters, decide where you want it and then spell it out.  The chipboard letters have sticky squares on the back of them so they were easy to stick down.  For the larger letters we used a hot glue gun.


(I've included a picture of the chipboard letters. I had the hardest 
time finding them because I didn't know what they looked like!)


Then start spraying your white spray paint.  
Because our canvas was so large it took several coats (it could actually probably use another coat.)  
Just keep spraying until you're satisfied that it's evenly coated.

Now here's where that acrylic paint comes into play.
Using the paint and a brush, paint the side edges of the canvas.  
This part was the most tedious and took the longest, and we had 3 people working on it.
Boy, oh boy, do I love that pop of color!


Now I have to admit, when we got home and hung it back up, I didn't love it.  It was hard to go from seeing something dark on the wall to seeing something so stark white.  But it has grown on me.  We're slowly repainting our house (changing the color scheme) so I think the new color will look great behind it!


P.S. - If you want to see a couple other things I have done (inspired by Pinterest) peek over at the right side of the page and click on "Pinterest" under the words screaming "LOOKING FOR SOMETHING???"  
I highly recommend the homemade Febreze!

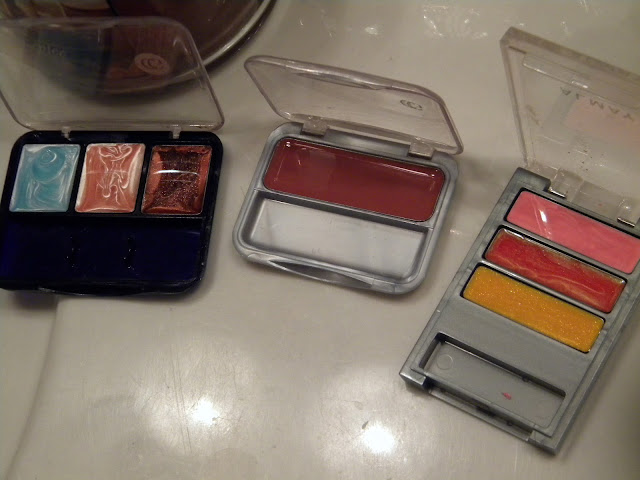
DIY: Play Make-Up

I found this idea on the lovely and addicting world of Pinterest.

This project is super easy and will definitely make your little girl feel pretty special.

All you need is:
~ nail polish (I bought the cheap stuff from Wal-Mart)
~ empty make-up containers


  Clean out your make-up containers with warm water and soap and dry them completely.

  Slowly fill the containers with nail polish.  
As the nail polish dries, it shrinks down quite a bit so I filled it all the way to the top of the silver lining.

To ensure the polish dries level, make sure the containers are lying completely flat on a hard surface


And that's it!  You're done!  I  let Karlie's make-up dry for 3 days before I showed it to her.  This will give it time for the fumes to go away and will ensure the polish is completely dried.


Homemade Febreze

I found the "recipe" for this over on Pinterest and could not wait to try it.

All you need is this:


~ 1/8 cup of your favorite fabric softener
~ 2 tablespoons of baking soda
~ hot tap water

Simply pour the fabric softener and baking soda into an empty spray bottle (I used an old Shout bottle), add hot water to fill the bottle up, shake it up, and start spraying!  I made this on Tuesday and I love it!  


PS - If you click my link up there to Pinterest, and then click the link you find there, it will eventually take you here, where the author gives a price comparison of making your own, and actually buying a bottle of Febreze.  Also, if you haven't checked out Pinterest, click my "Follow Me on Pinterest" button on the right side of the blog and check it out.  You will be addicted!


My One-derful Table

The reason I think this table is so wonderful is because it cost me $1.00!

Sorry the pictures are so grainy...I don't know what to say.


Like most things that cost $1.00, it just needed a little bit of love.  We decided to paint the metal part with some left over spray paint from a slightly-failed attempt at a headboard (that's another story for another day...)  Then I took the glass table-top out and scrubbed it the best I could but it refused to look clean.

On to Plan B.

We bought a piece of wood ($4) that is 1/4" thick from Lowe's, traced the circle onto it, and cut it out with a jig saw.  Then we took some zebra print fabric ($4) from Joann's and wrapped it around the wood, using spray adhesive and staples to attach it.


That was all it took!  It fits perfectly beside the chair in our bedroom!

Again, I'm sorry that the pictures are so grainy.  If only I had a Nikon D5000....


Pull Up a Chair

Back in April, when I shared my crafty corner, it was missing a chair.  Since then, while searching for the perfect chair, I've been using a folding metal chair.

Finally, the day came.  While we were walking around Faith Rescue Mission, my friend and fellow DIY-er Anna, found this for me...

{you can also see the chair I've been using on the right side of the picture...}

What made this chair even more appealing was the price...


$10.00!  Not too shabby.

Now anyone who has spent any length of time with us knows we do not like to pay full price and will avoid doing so at all costs, whether it's through coupons or asking for a discount (JP is much better at it than I am but I'm learning...it never hurts to ask.  The worst that will happen is they say no).  This holds true even at thrift stores.  However, before I could put my crazy bargaining skillz to use , they gave us 50% off because Kalie flashed her student ID.  So I bought this chair for $5.00!

The first thing we did was remove the seat.

 It always helps to have a toddler around...she has to earn her keep after all.
Buddy Fruits don't grow on trees, baby doll!


The chair was slightly coming apart on one side so JP drilled some screws in to hold it together.


Then using a white wood filler, he filled in the spaces over the screws.  After it dried, we sanded it down until it was smooth.


We applied one coat of primer...


And then one coat of glossy white...


We found the material at Hobby Lobby.  Using a 40% off coupon, we paid $4.98.  We laid it face down on the floor, put the cushion on top, and then probably went a little over board with the staple gun.  If we saw a loose spot, we stapled it.


When we were finished, we trimmed all the excess material.


After attaching the seat, we were done!  And it only cost us $9.98.

{clicking the picture should make it larger}


What's not to love?

Mirrors Mirrors on Our Walls

Sorry for the lack of posting!  It doesn't mean we haven't been busy though!

The two mirrors we have in our house (besides bathroom mirrors) received a little love and attention recently.

Mirror #1 {the one in our master bedroom}
We actually fixed this one up back in March but it wasn't until yesterday I realized I never posted about it.   This beauty was bought at an antique store when I was in tenth grade, sometime in 2001 or 2002.  It was just about the only thing I contributed to our new life when we got married in 2006.  Since then, it has always hung faithfully over my jewelry stand, mostly collecting dust.

 
Side Note
I was originally going to use this picture:

Notice anything??  Look really hard and you can see a very creepy version of my husband in the reflection.
I didn't know he was standing there until I uploaded the picture and then had to retake it.  Nice babe.

Anyway, after a little bit of sanding and slopping on about 3 or 4 coats of white paint,
here she is in all her glory:


My inspiration to paint this mirror came when I found a mirror (very similar in style) at Z Gallerie.  The only difference??

My mirror - $0 (I already had the mirror and the paint)
Z Gallerie's - $399.00
Cha ching!

Mirror #2 {the one in our living room}
This project we started and finished yesterday.  We bought this mirror in December 2006 and we thought it was the best thing we'd ever buy.  It was our first (and last) purchase from Kirklands.  Since then, it has hung over our couch in Kentucky, on our dining room wall in Texas, and now is back over our couch in Alabama.


Now with mirror #1, we use a bucket of paint and some paint brushes.  However with this one, we happened to already be on a spray painting spree so we spray painted this one.  We used one coat of white spray primer and 2 coats of high-gloss white spray paint and ended up with this:


Don't you just love white paint?  For a while, my younger sister {I don't like to name names} teased me because my response to any home-decor-remodeling question was, "Paint it white!"

So I submit to you that you could paint anything white, and it will in fact look fabulous!